Viral TikTok Focaccia Garden Art Bread: The Complete Guide
Prep: 20 min + 2 hours rise (or 18–72 hours cold ferment) | Bake: 25 min | Makes: One 9x13 pan (8 slices)
A hot chocolate bomb is entertainment. A smash burger is technique. But focaccia garden art bread is a baking project where the canvas is the food.
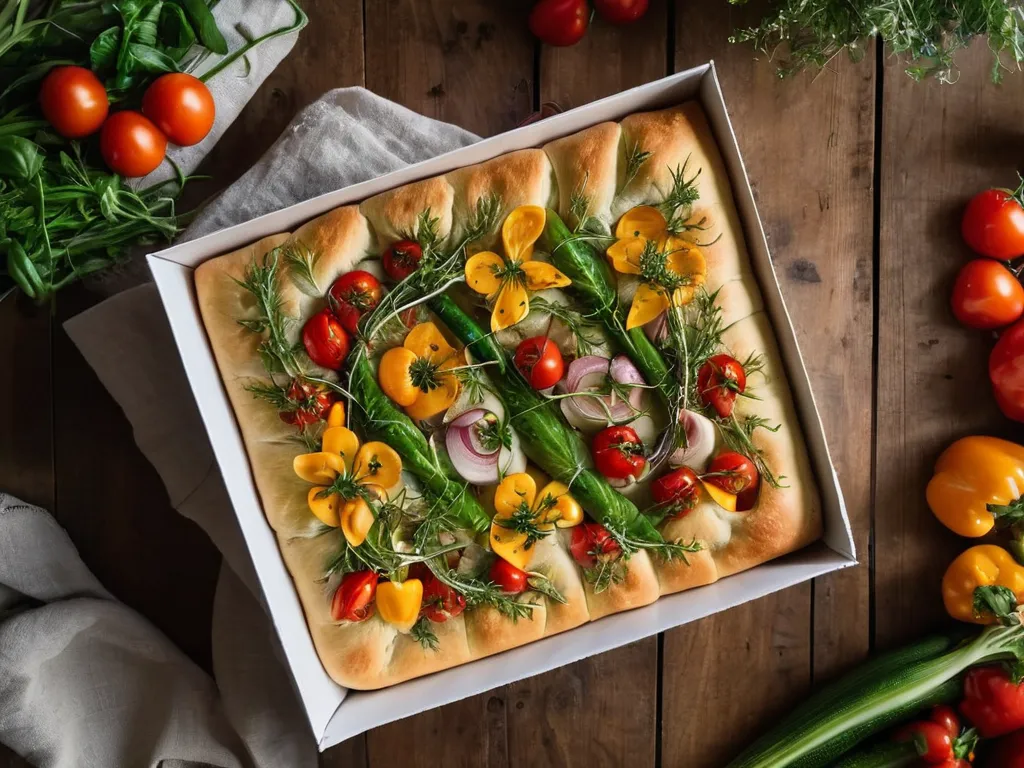
The idea: arrange sliced vegetables, herbs, and olives on top of focaccia dough before baking to create a garden scene, an abstract floral pattern, or a landscape. The vegetables roast in place as the bread rises and sets around them. The result looks like an edible painting.
The trend began on Instagram, not TikTok. In January 2019, Teri Culletto — a home baker on Martha’s Vineyard who posts as @vineyardbaker — went to see Van Gogh’s Sunflowers at the Museum of Fine Arts, Boston, and, in her own words, couldn’t get it out of her head. She started pressing vegetables and herbs into raw focaccia dough to recreate that garden imagery, a project she nicknamed “Van Dough.” Her Instagram posts spread through the baking community quietly for about a year. Then the pandemic hit.
In spring 2020, with millions of people home and cooking during lockdown, the technique exploded across Instagram, TikTok, and food blogs everywhere. The appeal was obvious: the technique is forgiving (focaccia dough is hard to ruin), the art doesn’t need to be perfect (the baking process does a lot of the visual work), and the result — a golden, fragrant, visual loaf — delivers disproportionate reward for a reasonable time investment.
Here’s what actually matters for results that are both beautiful and correct.
TL;DR
- Same-day rise (1.5–2 hours at room temp) works fine. Cold ferment (18–72 hours in the fridge) makes it taste substantially better and produces a lacier crumb.
- More olive oil than you think — it’s not a diet recipe, and the oil is what creates the crispy bottom and roasts the vegetables.
- Plan your design before you touch the wet dough. Lay vegetables out on a cutting board first.
- Press vegetables firmly into dimples — don’t just rest them on the surface. Anything not anchored can slide off during baking.
- Robust herbs (rosemary, thyme) go on before baking. Tender herbs (basil, parsley) go on after.
- Avoid raw beets and red cabbage — they bleed purple into the dough.
The Dough: Deliberately Simple
Focaccia dough is intentionally forgiving because it’s high-hydration and no-knead. The water-to-flour ratio (called hydration, expressed as a percentage) is roughly 80–85% — much wetter than pizza dough (60–65%) or sandwich bread (65–70%). Most bakers treat 80% as the reliable target; the recipe below sits at about 83%. That extra water is what creates the open, bubble-rich crumb and the characteristic soft interior. The higher the hydration, the more dramatic the air pockets — which is exactly what you want for art focaccia, where a more open crumb structure makes the finished loaf look more impressive when sliced. Push much past 85% and the dough gets genuinely hard to handle without practice, so 80–83% is the sweet spot for a first attempt.
Because the dough is so wet, gluten development happens through time and a brief folding sequence (or just time alone), not through kneading. You can’t overwork it the way you can a firmer dough. The stickiness that makes it hard to shape is exactly what produces the best focaccia texture.
Flour choice:
- All-purpose flour (10–11.7% protein) produces a good, soft focaccia. It’s the most available option and the most forgiving for beginners.
- Bread flour (12–13% protein) is actually superior for art focaccia: the higher protein develops stronger gluten, which traps more gas during fermentation and produces a taller, more open crumb with larger, more dramatic air bubbles. If you have bread flour, use it, or replace half the all-purpose flour with it.
- 50/50 bread flour + 00 flour: The combination recommended by many serious bread bakers — the bread flour provides the open crumb structure; the 00 flour (Italian finely-milled) adds the silky, light texture of traditional Italian focaccia. Worth trying if you can find 00 flour at a specialty grocery store.
- 00 flour alone: Produces authentic Italian focaccia with a very tender, light crumb. Harder to find and less dramatic bubble structure than bread flour; not the best choice for art focaccia specifically.
Same-Day vs. Cold Ferment: The Choice That Matters Most
The single biggest improvement you can make to focaccia art bread — more than any technique adjustment — is switching from a same-day rise to a cold ferment.
Same-day rise (1.5–2 hours): Works well. The bread will be good. Use this when you need focaccia today and didn’t plan ahead.
Cold ferment (18–72 hours in the fridge): The bread will be noticeably better — more complex flavor (subtle tang from slow fermentation), a more open and bubble-rich crumb, and a crispier bottom crust because the longer rest gives the gluten time to fully relax and spread into a thinner layer against the pan.
For art focaccia specifically, the cold ferment is worth it: the open crumb structure makes the finished bread look more dramatic when sliced and the surface texture around the vegetables has more character.
To cold ferment: mix the dough, cover the bowl tightly with plastic wrap, and place it directly in the refrigerator without a room-temperature rise first. Leave it for 18–72 hours. The yeast will work very slowly at refrigerator temperature (~38°F), and the dough will gradually double. When you’re ready to bake, take it out, let it sit at room temperature for 30 minutes to take the chill off, then transfer to the oiled pan.
The Olive Oil Rule: More Than You Think
The recipe calls for 1/4 cup of olive oil in the dough itself, plus 2 tablespoons in the pan, plus another tablespoon drizzled over the dough before decorating. That’s close to 1/2 cup total for one loaf. This is correct.
The oil in the pan creates the crispy bottom: it effectively fries the base of the dough against the metal surface. Without oil, the bottom is pale and soft. With it, the bottom is deeply golden and crunchy — the most satisfying part of the bread.
The oil drizzled over the top helps the vegetables roast rather than steam. In the 25-minute bake time, the moisture released by the vegetables needs to cook off quickly; oil accelerates that process and encourages browning at the edges of each vegetable piece.
Don’t substitute butter. Butter has a lower smoke point (~350°F) and burns at 425°F — it also creates a different flavor profile that doesn’t suit Italian-style bread. Olive oil is correct here.
Decorating: The Vegetable Selection Guide
This is where most guides are vague. The reality is that not all vegetables work, and knowing the difference between a “use this” and an “avoid this” saves a ruined design.
Colors that work well
Reds: Halved cherry tomatoes (the workhorse of focaccia art — reliable, vivid, roast beautifully). Thinly sliced red bell pepper strips. Piquillo peppers from a jar, drained.
Yellows and oranges: Yellow cherry tomatoes, orange cherry tomatoes, thinly sliced yellow or orange bell pepper, thin yellow squash rounds.
Greens: Scallion greens (cut into 2–3 inch lengths — excellent for stems, grass, and vines), fresh rosemary sprigs, thyme sprigs, edamame, thin zucchini rounds, blanched broccoli florets, fresh peas.
Black and deep purple: Kalamata olives or any pitted black olives (sliced or whole), thinly sliced red onion (rings separate into purple petals), purple basil (holds color better than green basil at high heat, though still best added after).
Vegetables that bleed — avoid these
Raw beets bleed vivid red-purple into everything they touch — neighboring dough, adjacent vegetables, everything. By the time the bread is baked, a beet slice will have turned the surrounding inch of dough an unpleasant grayish-purple. Same issue with raw red cabbage, which bleeds even more aggressively.
If you want a deep red element, use cherry tomatoes or red bell pepper instead. If you specifically want beets, roast or steam them first (so the color is mostly set) and use them as a topping after baking.
Vegetables that won’t cook through
Raw carrots (even thinly sliced) take 30–40 minutes to soften at 425°F — they’ll still be hard and raw in the center when the bread is done. Same problem with raw parsnips, turnips, and raw beets (in addition to the bleeding issue). If you want an orange element, use orange bell pepper slices — they’re thin enough to cook through and don’t bleed.
Herbs: before vs. after baking
Go on before baking (survive the oven):
- Rosemary — the most popular choice; woody, waxy needles hold up perfectly. Press the stem end into the dough so the sprig fans out.
- Thyme — small sprigs or individual leaves scattered across the dough.
- Sage — large leaves char slightly at the edges, which is attractive; use flat sage leaves pressed against the dough.
- Oregano — dried or fresh; either holds color.
Go on after baking (don’t survive the oven):
- Fresh basil — turns black and bitter in a 425°F oven. Add it immediately out of the oven, where the residual heat wilts it gently without destroying it.
- Flat-leaf parsley — same issue; add after.
- Cilantro — add after; extremely heat-sensitive.
- Microgreens — add after; for garnish only.
- Mint — add after.
The simple rule: woody herbs before, tender herbs after.
Design Planning: Before You Touch Wet Dough
This is the step most first-timers skip, and skipping it leads to design regret.
The dough is wet and sticky when it’s time to decorate. Once you press a vegetable into it, repositioning tears the surface. If you’re trying to improvise a garden scene on a wet dough surface, you’ll feel rushed and make placement errors.
Instead: while the dough is in its second rise (the 30–45 minute pan rest), cut and prep all your vegetables. Then lay them out on a cutting board in the arrangement you plan to create. Check the composition. Move things around freely on the cutting board — it doesn’t stick. Adjust the spacing, the proportions, the color balance.
Only when you’re happy with the arrangement on the cutting board do you begin transferring to the dough. Work methodically from one end to the other. If you’re creating a scene (garden with flowers, sky, path), work from the background to the foreground.
The Dimpling Technique
Dimpling is not decorative — it’s structural.
Press down firmly with all five oiled fingers pushed close together. Push nearly to the bottom of the pan. You want deep wells in the dough surface, not shallow impressions. The dimples do three things:
- They give each vegetable a “seat” — a concave pocket to press into so the piece is below the dough surface rather than balanced on top of it.
- They create channels for olive oil to pool, which keeps the bread moist and helps the bottom crisp evenly.
- They prevent the dough from rising into a dome during baking — the dimples are structural valleys that help the bread maintain a flat, even surface so the decoration stays visible.
Don’t be timid. Deep, decisive dimples across the entire surface.
The Pressing Step
After you place a vegetable piece, press it into the dough — specifically, press it into one of the dimples you just made. The piece should sit slightly below the surface level of the dough, with dough partly surrounding it. This is what keeps it in place during baking.
Pieces that are just resting on the surface have nothing anchoring them. As the bread bakes and the oven creates convection currents, lightweight pieces (onion rings, herb leaves, small vegetable slices) can migrate. Pieces pressed into the dough have the rising bread partially securing them.
Practical technique: after placing each piece, use your thumb to press it down and then use one finger to press the surrounding dough gently up around it. Think of it as seating the vegetable in the dough rather than placing it on top.
5 Design Templates
Garden scene: Rows of cherry tomatoes for flowers (cut side up), scallion stems rising from each, rosemary sprigs for trees at the back, a winding path of thinly sliced onion, edamame scattered as ground cover. Start with the background elements (trees, tall items) and work forward.
Herb garden grid: Divide the focaccia mentally into quadrants. Each quadrant gets a different herb treatment — one with densely packed thyme, one with rosemary sprigs in a geometric pattern, one with thinly sliced olives arranged in rows, one with a half-tomato mosaic. Bold, graphic, and easier to execute than a freehand scene.
Floral abstract: Clusters of cherry tomato halves (petals) arranged in flower shapes with olive slices at the center and scallion-green stems. No realistic landscape — just repeated flower motifs across the surface. The most forgiving design for beginners because slight imperfections don’t matter.
Summer minimalist: A sparse arrangement of a few herb sprigs, a dozen cherry tomatoes, and lemon zest scattered over the surface (zest goes on after baking). The restraint makes each element more visible, and the bread’s golden crust becomes part of the design.
Seasonal / occasion: Match the design to the moment. Spring: green pea flowers, edamame grass, carrot-free spring scene. Fall: arrange sliced yellow and orange bell pepper to suggest falling leaves. Birthday: spell out initials in rosemary or olive arrangements.
Baking and the Finish
A 425°F oven for 22–25 minutes is the correct range for a 9x13 pan of focaccia about 1 inch thick. Pull it when:
- The top is deeply golden, not pale yellow
- The vegetables are slightly caramelized at the edges (some char is attractive and correct)
- The bottom is dark golden brown — check by lifting a corner with a spatula
If the top looks done but the bottom is pale, put the pan directly on the oven floor (if using gas) or on the lowest rack for 3–5 more minutes.
Immediately out of the oven: flaky salt, then the post-bake fresh herbs. Let it rest in the pan for 10 minutes before slicing — this lets the bottom crust set and prevents steam from escaping too quickly and making the crumb gummy.
Cost Comparison
| Specialty bakery | At home | |
|---|---|---|
| One 9x13 focaccia | $18–28 | ~$4–6 in ingredients |
| Per slice (8 slices) | ~$2.50–3.50 | ~$0.60–0.80 |
| Design customization | Whatever’s available | Complete control |
The main cost drivers are flour ($0.50 for the amount used), olive oil ($1.50–2.00), and whatever vegetables you use. Cherry tomatoes and herbs are the most common and cheapest choices — a pint of cherry tomatoes runs $2–3 at most grocery stores.
More Bread and Baking Projects
- Copycat Papa John’s Pizza Dough — the pizza dough technique (lower hydration, more structure) that’s the natural companion to focaccia knowledge
- Copycat Olive Garden Breadsticks — the garlic-butter finish technique applied to yeasted breadsticks
- Viral TikTok Sourdough Discard Crackers — a way to use excess starter or discard from long-ferment bread projects
- Copycat Outback Bread — the dark, slightly sweet molasses-based bread that goes with everything
- Viral TikTok Cottage Cheese Flatbread — a high-protein, no-yeast flatbread that uses cottage cheese in place of flour
See all recipes → | quick dinners →