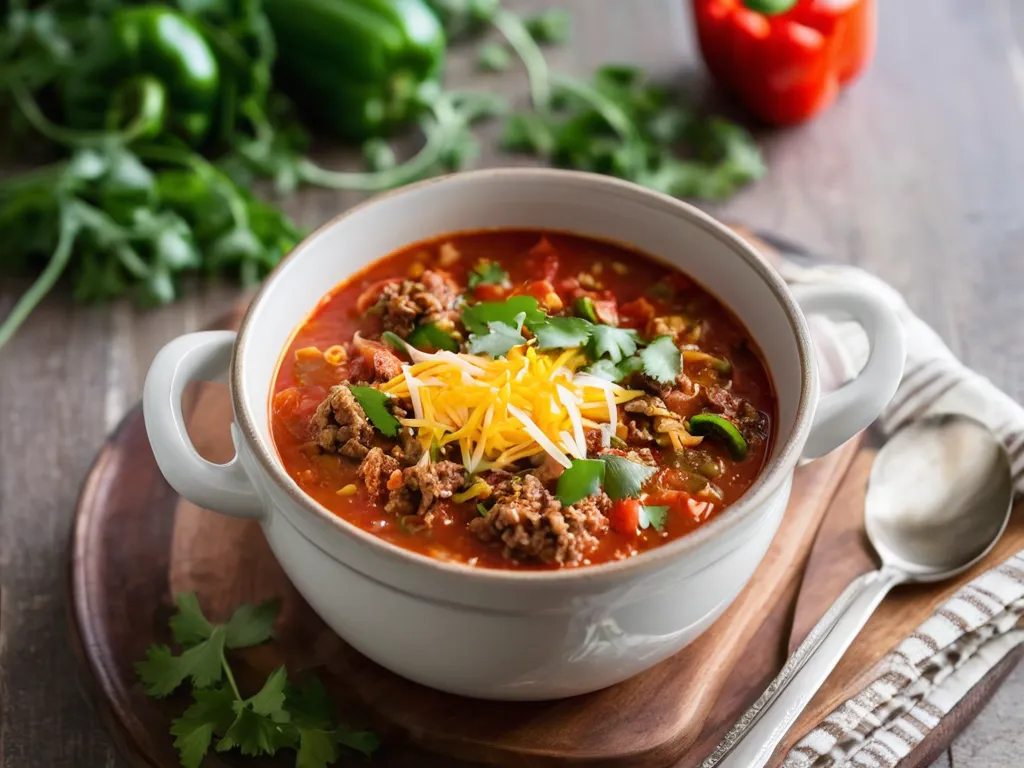
Stuffed Pepper Soup
TL;DR: Everything that makes a stuffed pepper good — browned ground beef, bell peppers, tomatoes, Italian seasoning, rice — in a 40-minute one-pot soup. The technique that makes it taste like stuffed peppers (not tomato soup with beef): brown the beef until you see actual color, use the right pepper-to-tomato ratio, add Worcestershire for depth, and always add pre-cooked rice at the end rather than raw rice that stiffens the broth.
Stuffed pepper soup became a staple of the fall SoupTok wave around 2022 — part of the same cozy soup season that made comfort food content dominant on the platform every October. The concept is obvious once you think about it: stuffed peppers are good, but hollowing out six peppers, making filling, baking for 45 minutes, and hoping they don’t collapse is not a weeknight activity. Throw everything in a pot and you get the same flavors in 40 minutes, plus the advantage that soups bring — the broth carries the seasoning into every spoonful.
Most recipes get the concept right and miss the techniques. Here’s what actually matters.
What Makes It Taste Like Stuffed Peppers (Not Tomato Soup)
Three things separate stuffed pepper soup from tomato soup with ground beef mixed in:
1. Real browning on the beef. Ground beef cooked to gray — steamed rather than seared — tastes flat and contributes almost nothing to the broth. Brown it properly and the Maillard reaction develops hundreds of new flavor compounds from the interaction between amino acids and sugars on the meat’s surface. Those compounds dissolve into the broth and are what give the soup its savory depth. The technique: heat the pot until it’s genuinely hot, add the beef, and leave it untouched for 90 seconds to 2 minutes before breaking it up.
2. The pepper-to-tomato ratio. The most common reason stuffed pepper soup tastes like tomato soup: too much tomato. What works is close to equal parts by volume — 3 medium bell peppers (about 3 cups diced) to one 28-oz can of crushed tomatoes. At that balance, the pepper flavor registers clearly against the tomato base. Add a second can and the pepper disappears entirely. A tablespoon of Worcestershire sauce — a classic stuffed pepper recipe ingredient that copycat soup recipes routinely drop — adds the umami bridge between the beef and tomato layers that the original dish provides naturally.
3. Italian seasoning as the defining spice. The spice profile of a traditional stuffed pepper is oregano, basil, and thyme — exactly what Italian seasoning contains. It’s what makes the bowl read as stuffed pepper soup rather than any other beef-tomato one-pot. Don’t substitute, don’t skip it.
Bell Pepper Color: Why the Mix Matters
Green bell peppers are unripe; red, orange, and yellow are the same plant fully ripened. The flavor difference in soup is real and measurable.
Green peppers contain a volatile aromatic compound called 2-methoxy-3-isobutylpyrazine (IBMP) — detectable at just a few parts per trillion, responsible for their sharp, grassy bite. This compound is highly heat-sensitive. Simmering drives it off into steam, leaving a mellow vegetal backbone. Green peppers also hold their shape better than ripe peppers and contribute an earthiness that is distinctly “stuffed pepper” in character.
Red, orange, and yellow peppers have approximately twice the natural sugar content of green peppers, no IBMP to speak of, and a softer, sweeter quality that rounds the acidity of canned tomatoes rather than adding to it.
Best mix: Two green, one red or orange. The green peppers provide the classic stuffed pepper flavor — they’re what most traditional stuffed pepper recipes call for. The red or orange rounds the acidity and adds color to the bowl. All-green soup is slightly sharper and more bitter; all-red soup veers sweet and loses the classic bell pepper character.
One technique improvement over most recipes: add the diced peppers to the pot after the onion and cook them 3–4 minutes before adding any liquid. Brief contact with the hot pot develops a small amount of surface browning that survives the simmer and deepens the broth.
The Rice Rule: Never Cook Raw Rice in the Soup
This is the most common technical failure in stuffed pepper soup, and it has two stages:
In the pot: Raw rice releases amylopectin starch as it cooks — a long-chain starch molecule that leaches into the broth and makes it thick, cloudy, and gummy. The soup goes from a clean savory broth to something approaching a stew.
In the fridge: The rice continues absorbing liquid overnight. The soup you stored comes out as a dense beef-and-rice paste with a layer of tomato gel. It’s edible, but it’s not what you made.
The fix: Cook the rice in a separate small pot while the soup simmers. Stir the cooked rice into the soup in the last 5 minutes — enough time to warm through and pick up the broth flavor without breaking down. For leftovers, store rice separately in its own container and combine per bowl when reheating. This keeps the broth tasting like broth through day three or four.
The Browning Step (Don’t Rush It)
When the instructions say “brown the beef,” they don’t mean cook it until it’s no longer pink. Gray beef is steamed beef. Browned beef is Maillard-reacted beef. The difference in a broth-based soup where that meat is the main flavoring is significant.
To actually brown ground beef:
- Heat the pot over medium-high heat before adding the meat
- Add the beef and leave it untouched — no stirring, no breaking up — for 90 seconds to 2 minutes
- Watch the edges: when you see a brown color creeping up from the bottom, that’s the signal
- Only then break it up and continue cooking
If the beef is releasing a lot of liquid and steaming, drain the accumulated gray liquid and continue on higher heat. That liquid is preventing browning from happening.
After browning: drain the rendered fat. With 80/20 ground beef you’ll have a meaningful pool of fat in the pot. If you don’t drain it, the broth will be greasy rather than rich. For a leaner version without the draining step, the same browning technique applies to Wendy’s chili and Texas Roadhouse chili — the principle is identical.
Variations
Ground turkey: Leaner and milder but absolutely workable. Add an extra tablespoon of Worcestershire and 1/4 teaspoon smoked paprika to compensate for the reduced fat flavor. Use beef broth, not chicken broth — the savory depth of beef broth is part of the flavor profile here. For another chicken-based pepper-and-tomato soup worth bookmarking, see the Chick-fil-A chicken tortilla soup copycat.
Italian sausage: Swap the ground beef for sweet or hot Italian sausage, removed from casings. The sausage adds fennel and red pepper notes that work beautifully with the bell peppers. No draining needed — Italian sausage fat is lighter and integrates into the broth. The result is a distinctly different soup, but an excellent one.
Low-carb / cauliflower rice: Substitute 2 cups of riced cauliflower for the white rice. Add it in the last 10 minutes of simmering, not the final 5 — cauliflower takes longer to soften than pre-cooked white rice.
Creamy stuffed pepper soup: After removing from heat, whisk in 4 oz of softened cream cheese cut into small cubes until fully melted. Or stir in 1/2 cup sour cream off heat (never while the soup is boiling — sour cream breaks at high heat). The cream cheese version is more foolproof and produces a thicker, richer result. For the fully cream-based comfort soup approach, see Panera broccoli cheddar soup — similar technique, different flavor profile.
Slow cooker: Brown and drain the beef first on the stove — this step is not optional. Add everything except the rice to the slow cooker and cook on low 4–6 hours or high 2–3 hours. Stir in pre-cooked rice in the last 30 minutes, or add per bowl at serving. The slow cooker version produces softer peppers and a slightly more melded broth.
Make-Ahead and Storage
Stuffed pepper soup genuinely improves overnight as the flavors deepen. Practical storage guide:
With rice mixed in: Keeps 3–4 days in the fridge. The rice will continue absorbing broth, so the texture gets thicker by day two. Add a splash of broth when reheating and it comes back. Still very good.
With rice stored separately: The soup base keeps 4–5 days and the broth texture stays exactly right. Combine per bowl when reheating. Worth the extra container if you’re making it for the week.
Freezer: Freeze the soup base without the rice for up to 3 months. Cool completely before freezing. Freeze in flat zip-lock bags for faster thawing. Thaw in the refrigerator overnight, reheat on the stovetop, and cook fresh rice to add at the end.
Reheat on the stovetop over medium heat, stirring occasionally. The microwave works, but the beef gets slightly rubbery — five extra minutes on the stove is worth it for the full version.
What to Serve With Stuffed Pepper Soup
The soup is a complete meal on its own, but something to dip improves it.
Bread. This soup has a broth thick enough to hold to bread without going soggy immediately. Olive Garden-style breadsticks are the natural pairing — soft, buttery, and designed to go with a tomato-forward base. Golden Corral dinner rolls work well if you want something more substantial. Cornbread is another classic here: a quick skillet version bakes in 20 minutes and is ready exactly when the soup finishes simmering.
A simple green salad. The soup is rich from the beef and tomatoes; a lightly dressed salad with romaine, arugula, or spinach adds brightness without competing with the bowl.
Grilled cheese. A grilled cheese sandwich alongside a bowl of stuffed pepper soup is the same impulse as tomato soup and grilled cheese — the soup’s tomato backbone supports it, and the contrast of the crispy buttered bread against the soft soup is directly complementary.
Cost Breakdown
| Item | Approximate Cost |
|---|---|
| 1 lb 80/20 ground beef | $5–6 |
| 3 bell peppers | $3–4 |
| 1 can (28 oz) crushed tomatoes | $2 |
| 2 cups beef broth | $1 |
| Rice, onion, garlic, seasonings | ~$2 |
| Total (serves 6) | $13–15 |
That works out to roughly $2.15–2.50 per serving for a bowl that fills out as a full dinner. Restaurant versions of stuffed pepper soup — where they appear at casual dining chains — typically run $10–14 a bowl.
For more hearty one-pot soups that use the same start-with-a-sauté-then-simmer structure, Olive Garden Zuppa Toscana builds a sausage-and-potato broth from the same browning-first technique with a cream finish. Panera’s chicken noodle soup is the weeknight alternative when you want something lighter. And if bell pepper-forward flavors are specifically what you’re after, the Chick-fil-A chicken tortilla soup uses a similar tomato-pepper base with a Southwestern spice direction instead of Italian seasoning.