Pin It

Brown Butter Herb Stuffing

Brown Butter Herb Stuffing
Jump to Recipe
Prep 25 min (+ 1 hr bread-drying) Cook 55 min Serves 12
Quick answer: To make brown butter stuffing: tear 1½ pounds of day-old sourdough into 1-inch pieces and dry in a 300°F oven for 20–25 minutes until fully dried but not browned. In a large skillet over medium heat, cook 8 tablespoons unsalted butter, swirling often, until the milk solids turn light amber and smell like hazelnuts — about 5 to 7 minutes. Add 1 large diced yellow onion and 4 diced celery stalks and cook until soft, 8 minutes. Add 5 minced garlic cloves, 2 tablespoons chopped fresh sage, 2 tablespoons fresh thyme, and 1 tablespoon fresh rosemary; cook 2 minutes. Toss dried bread with aromatics in a large bowl. Whisk 2 eggs into 2½ cups low-sodium chicken stock, pour over the bread, and toss to coat. Let sit 10 minutes to absorb. Transfer to a buttered 9×13 dish, press into an even layer, cover tightly with foil, and bake at 375°F for 40 minutes. Uncover and bake 15 to 20 minutes more until the top is deep golden brown and crunchy. Rest 10 minutes before serving.

Brown Butter Herb Stuffing

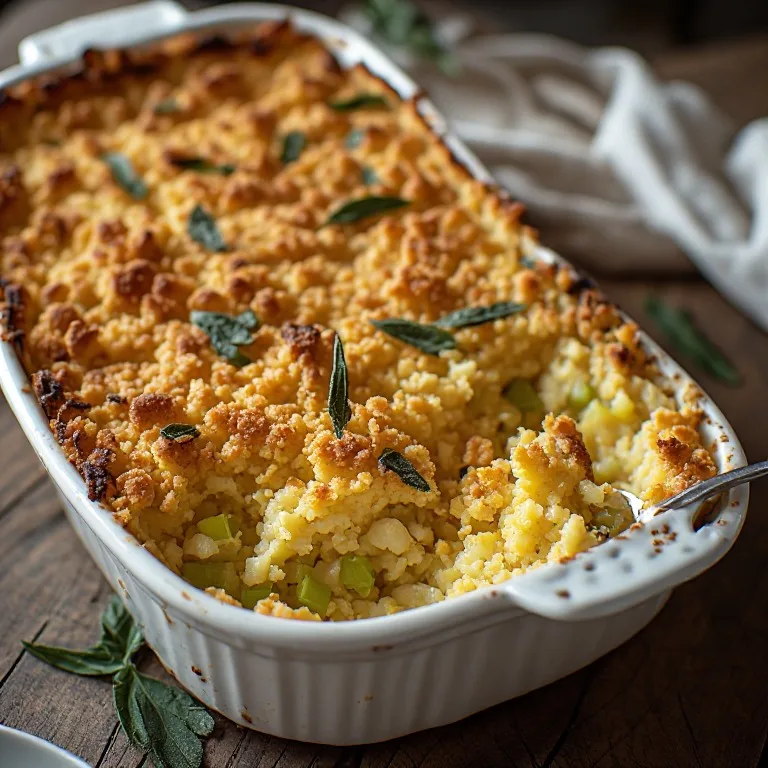
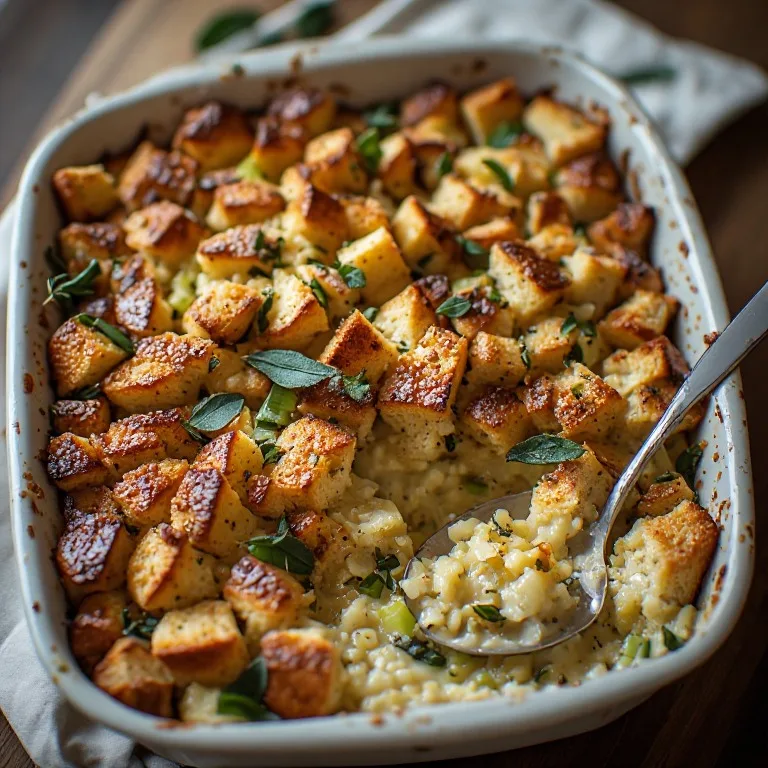
The viral TikTok brown butter stuffing that fixes every Thanksgiving stuffing complaint — crispy top, custardy center, and a deep nutty flavor that butter-and-broth versions never reach. Day-old sourdough, browned butter, fresh sage and thyme, two-stage bake.

Easy Prep: 25 min (+ 1 hr bread-drying) Cook: 55 min Total: 2h 20m12 servings ~$4.50/serving
Prep25 min (+ 1 hr bread-drying)
Cook55 min
Total2h 20m
Servings
12
At home~$4.50/serving
vs
Restaurant~$20.25/serving
You save ~78%

The Story Behind the Recipe

Stuffing has always occupied an odd place at the Thanksgiving table — the dish almost everyone considers their personal favorite yet the one most often served in its worst form: dense, waterlogged, underseasoned, cooked inside the bird until it slumps. TikTok food creators, whose main skill is giving old dishes the precise technique upgrade they have always needed, found the stuffing problem and solved it fast. The hashtag #brownbutterstuffing and its variations accumulated millions of views starting in 2024, all sharing the same central discovery: brown the butter before it goes into the aromatics, and the flavor of stuffing changes from generic Thanksgiving background noise into something with actual toasty depth. The videos kept reproducing because the technique is genuinely surprising — the same amount of butter, the same ingredients, treated slightly differently, produces a result that tastes restaurant-quality without any extra work.

The brown butter trick works because of chemistry: at about 250°F, the milk proteins in butter undergo the Maillard reaction and transform into hundreds of flavor compounds that taste variously like hazelnut, caramel, and toasted bread. Plain melted butter misses this entirely. Using that browned butter as the fat base for sautéing the onion, celery, and garlic means every bite of stuffing carries those compounds rather than just the surface. The second technique the TikTok versions popularized — the two-stage bake — solves the soggy-or-dry binary. Covered for the first 40 minutes, the custard (eggs plus stock) fully cooks and sets the interior so it holds together in a soft, custardy slice rather than a crumble. Uncovered for the last 15 to 20 minutes, the top layer dries and turns deeply golden. A pan of this stuffing at a holiday dinner runs equivalent to about $6 in ingredients and seats 12 people. A comparable catered side from a restaurant or meal-delivery service runs $8–12 per person.

Nutrition Facts

Per serving (12 servings)
Calories295
Total Fat14g
Total Carbs34g
Dietary Fiber2g
Sugars3g
Protein8g
Sodium560mg

* Estimated values based on standard recipe preparation. Actual values may vary.

Ingredients

  • Bread base
  • Brown butter aromatics
  • Custard
  • Finishing

Instructions

💡
Pro tip: This recipe tastes even better the next day. The flavors need time to meld together in the fridge.
❄️
Storage: Keeps in an airtight container in the fridge for up to 2 weeks. Freezer-friendly for up to 3 months.
🦃 Free Thanksgiving cookbook — download now The Copycat Thanksgiving Cookbook A ready-made, photo-illustrated PDF of our best thanksgiving copycat recipes — free to download, no building required. Pay what you want to support if you love it.

Free PDF — instant download. We'll also send new seasonal copycat recipes now and then; unsubscribe anytime. Or just download it →

The viral TikTok brown butter stuffing upgrades one thing about a traditional recipe — the butter — and the flavor difference is immediate and obvious. Brown the butter until it smells like hazelnuts, use it to build the aromatics, and every bite of the finished stuffing carries that deep, toasty note that plain melted butter never delivers.

Why TikTok Fixed Stuffing

Stuffing has always been the dish most likely to disappoint on the Thanksgiving table: too wet, too dry, underseasoned, cooked inside the bird until it steams into a paste. TikTok food creators zeroed in on the core problem — generic fat — and the #brownbutterstuffing format went viral because the upgrade is so visible. Same ingredients. Same effort. Completely different depth.

The second technique that travels in the same videos: the two-stage bake. Covered at 375°F for 40 minutes, the egg-and-stock custard sets and firms the interior. Uncovered for 15 to 20 minutes, the top dries into a crunchy golden crust. No more choosing between stuffing that holds together and stuffing with textural interest — it does both.

Brown Butter vs. Melted Butter — The Actual Difference
Melted butter stuffingBrown butter stuffing
FlavorButtery, mildNutty, caramel, complex
Extra time—5–7 minutes
Extra ingredients—None
Technique requiredNoneWatch the color + smell
Reason it goes wrongNothing to watchOver-browned = bitter

The only failure mode for the brown butter is inattention — past light amber, the milk solids cross from hazelnut to burnt and the flavor turns sharp. Use a light-colored pan, swirl often, and pull the moment it smells nutty.

Make-Ahead Timeline
  • 2 days out: Dry the bread, store in open bowl at room temperature. Make browned-butter aromatics, cool, refrigerate.
  • 1 day out: Assemble the full stuffing in the baking dish, cover with plastic wrap, refrigerate unbaked.
  • Day of: Remove from refrigerator 30 minutes before baking. Add 10 minutes to the covered bake time. Proceed normally.
  • After baking: Keeps refrigerated 4 days. Reheat covered at 350°F for 20 minutes, then uncovered 5 minutes to re-crisp the top.
🥗

Make It Healthier

Love Brown Butter Herb Stuffing but want a lighter version? Try these simple swaps:

  • ✓Use a sourdough with a lower calorie density by choosing a whole-wheat or whole-grain sourdough — the fiber content (about 4g per serving vs 2g for white sourdough) slows digestion and makes the stuffing substantially more filling, so a smaller portion satisfies. Whole-grain sourdough also dries and absorbs stock identically to white sourdough in this recipe.
  • ✓Reduce the butter to 6 tablespoons from 8. Six tablespoons still produces visible browning and detectable hazelnut flavor in the finished stuffing while saving about 30 calories per serving. The aromatics may need 1 to 2 tablespoons of olive oil added when sautéing if the pan starts to look dry.
  • ✓Use vegetable stock instead of chicken stock and omit the eggs to make a fully vegan version. Without eggs, the stuffing won't have the same custardy interior — it will bake more as a pressed pilaf than a custard — but it's still delicious. Add 2 tablespoons of nutritional yeast to the stock mixture to approximate the savory depth the eggs provide.
  • ✓The celery and onion count as vegetables, but stuffing is typically a special-occasion side. For the rest of the plate, balance it with more vegetables and lean protein — the stuffing's purpose is the flavor and textural contrast it provides, and a modest scoop (about 2/3 cup) alongside other sides is nutritionally reasonable.

Frequently Asked Questions

Why does browning the butter make such a big difference in stuffing?

Plain melted butter is essentially fat plus water plus about 3% milk protein and milk sugar. When you cook butter to 250°F, those milk proteins and sugars undergo the Maillard reaction — the same browning reaction that makes bread crust, seared steak, and roasted coffee taste complex. This reaction produces hundreds of flavor compounds, many in the hazelnut and caramel family, that are entirely absent from plain melted butter. Stuffing made with melted butter tastes like herbed bread in broth — fine, familiar, flat. Stuffing made with browned butter tastes like those same herbs and aromatics have been concentrated and deepened by a layer of toasty, nutty fat. The technique adds about 5 to 7 minutes and zero additional ingredients. The flavor upgrade is disproportionately large relative to that effort, which is precisely why TikTok cooking creators kept posting it.

What bread works best for stuffing?

Day-old sourdough is the strongest choice for two reasons: its open, airy crumb absorbs the egg-and-stock custard deeply without collapsing (sandwich bread's tight crumb absorbs less and can turn gummy), and its slight tang provides a counterpoint to the richness of the browned butter and stock. Brioche works brilliantly for a richer, more decadent stuffing — the bread's egg-and-butter content creates an even custardy texture — but it's more expensive and heavier. Challah behaves similarly to brioche. Cornbread (1 skillet's worth, dried) makes a Southern-style version that's excellent with this brown butter method. The specific requirement is that the bread be fully dried before use: any bread — white, sourdough, whole wheat, brioche — that goes into stuffing wet will produce a dense, wet result. Fresh bread from the same day has too much moisture and produces a paste. Day-old means 24 to 48 hours out of the oven, or oven-dried.

Can I make this stuffing ahead of time?

Yes, and there are two approaches depending on how far ahead. One to two days ahead: assemble the fully mixed stuffing (bread, aromatics, custard) in the buttered baking dish, cover tightly with plastic wrap (not foil — plastic prevents the top from drying out in the refrigerator), and refrigerate unbaked. On the day, let it sit at room temperature for 30 minutes while the oven preheats, then add 10 minutes to the covered bake time since it's starting cold. The baked stuffing keeps for up to four days refrigerated and reheats well covered at 350°F for 20 minutes. Reheat uncovered for the last 5 minutes to re-crisp the top. It does not freeze well after baking — the custard becomes grainy when thawed. The component prep (dried bread, browned-butter aromatics) can each be done 2 days ahead and stored separately until assembly day.

What is the right ratio of stock to bread for stuffing that is custardy but not soggy?

For 1½ pounds (about 12 cups) of fully dried bread, 2½ cups of stock plus 2 eggs is the right ratio. Less stock than this produces stuffing that is dry and crumbles when scooped; more produces stuffing that never sets, stays wet, and has no textural contrast between top and center. The correct texture before baking should resemble a very moist, thoroughly coated bread salad — each piece damp and flexible but no pools of liquid sitting at the bottom of the bowl. The eggs are critical to this ratio: they provide protein that coagulates during baking and firms up the soaked bread into a cohesive structure. Without eggs (for a vegan version), you need to reduce the stock by ¼ cup and expect a looser result.

My stuffing top is soggy, not crispy — what went wrong?

Three likely causes. First, the foil was not removed during the final bake stage — the moisture that condenses on the foil's interior drips back onto the top and prevents crisping. The second bake must be uncovered. Second, the bread was not fully dried in the 300°F oven before mixing. Even slightly damp bread — bread that feels stiff but still has some give — absorbs more liquid than it should and the top never dries during baking. When in doubt, dry the bread for 5 more minutes: over-dried is far better than under-dried. Third, the baking dish is too deep. In a 3-inch-deep casserole dish, the stuffing layer is thicker and the top takes longer to crisp — extend the uncovered bake time to 25 to 30 minutes and check every 5 minutes after the 15-minute mark.

Can I cook this stuffing inside the turkey instead of in a pan?

Technically yes, but it's not recommended for three reasons. Safety: the USDA requires that stuffing reach 165°F inside the bird to be safe, which means the turkey's breast must reach well past its ideal 165°F before the stuffing's center catches up — this is the primary cause of dry Thanksgiving turkey breast. Texture: stuffing cooked inside the bird steams in the bird's juices and never develops a crispy top. Flavor: the turkey flavor absorbed by cavity stuffing is real but subtle, and the brown butter technique provides much more depth than bird juices would add. If you want the turkey dripping flavor without the drawbacks, roast the turkey on a rack over the stuffing in a high-sided pan (called dressing cooked beneath the bird) — the drippings baste the top naturally.

Can I add sausage to this stuffing?

Yes — Italian sausage or breakfast sausage is the most popular addition. Remove and crumble 1 pound of ground sausage from its casing and cook it in a separate pan until browned, about 8 minutes, then drain the excess fat. Fold the cooked sausage into the bread mixture with the aromatics before adding the custard. The sausage adds 30 to 50 calories per serving (depending on fat content) and shifts the dish from a vegetarian side to a more substantial, near-entrée portion. Smoked sausage or andouille works well with this brown butter base for a Southern-inflected version. Do not add raw sausage and rely on the stuffing bake time to cook it — the interior of the baking dish does not reliably reach the temperature needed to safely cook raw pork all the way through.

Does it matter whether I use fresh herbs or dried?

It matters specifically for sage. Fresh sage is a broad, pungent leaf that mellows when cooked in butter — the final flavor is complex, aromatic, and slightly earthy in a way that dried sage (which is already concentrated and can taste medicinal in large quantities) does not replicate cleanly. The substitution ratio for dried-to-fresh is 1:3 — use ½ teaspoon dried sage in place of 2 tablespoons fresh. For thyme and rosemary, the dried versions perform closer to fresh at that same 1:3 ratio and are acceptable if fresh herbs are unavailable. The best herb upgrade beyond this recipe's base: add 2 tablespoons of fresh flat-leaf parsley, stirred in off the heat at the end of the aromatics step. Parsley adds fresh brightness that counterbalances the richness of the browned butter and is the most common addition in restaurant-style versions.

Love this recipe? Share it!

Free PDF: our 12 most-wanted copycat recipes — instant download.

Made it? Buy us a coffee

Every recipe here is free, with no paywalls. If this one was a hit at your table, a small tip keeps new copycats coming.

$

Ratings & Reviews

—
No ratings yet

Rate this recipe

Click a star to rate

Leave a Review

0/500

CS

Copycat Spices Editorial

Researched + fact-checked. Every recipe on Copycat Spices is built from published sources — official ingredient lists, brand-published recipes, interviews and food-science references — and fact-checked before it goes live, then written as clear, step-by-step instructions for home cooks of all skill levels.

Learn more about our mission →