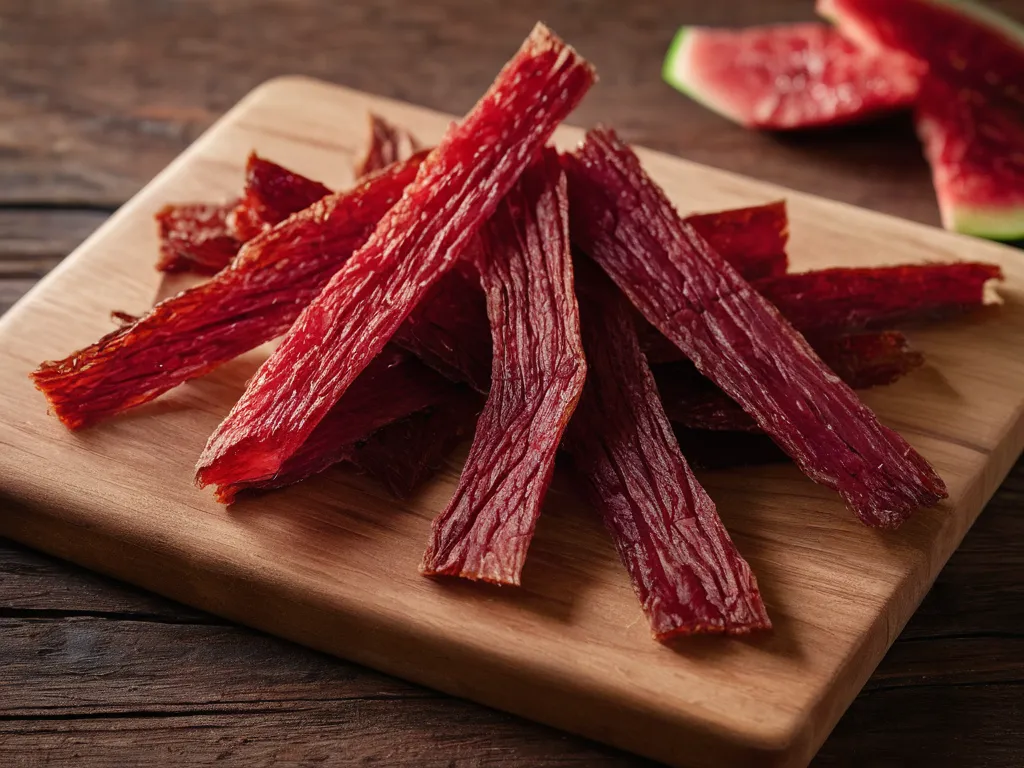
Watermelon is 91–92% water. That’s the entire story.
When you put watermelon strips in a dehydrator at 135°F and leave them there for 15–20 hours, the water leaves. Everything else stays. The sugars, the lycopene, the citrulline, the red pigment, the flavor — it all concentrates into a fraction of the original volume. What comes out is chewy, intensely sweet, and genuinely candy-like, without a gram of added sugar.
The TikTok wave that drove home-dehydrated watermelon into the mainstream (around summer 2022, with backpackers, homesteaders, and healthy-snack creators all posting variations) wasn’t built on a single creator’s video going viral. It was a discovery trend: thousands of independent people with dehydrators stumbling onto the same transformation, posting the before-and-after, and getting the same reaction — “that can’t be right.” It keeps resurfacing every summer for the same reason. Late June through August, watermelons are cheap, sweet, and everywhere. The transformation is genuinely surprising every time you see it.
TL;DR
Slice seedless watermelon into ¼-inch strips, remove the rind, season with Tajin and lime (or plain flaky salt), and dry at 135°F for 15–20 hours. Done when completely dry to the touch and pliable but breaks when bent sharply. Half a watermelon makes about 8–10 ounces of jerky. Best in peak watermelon season (July–September).
Why It Tastes Like Candy: The Actual Science
Fresh watermelon has a Brix (dissolved solids / sugar) reading of roughly 9–12° for a ripe specimen. The water that makes up 91–92% of the fruit is what dilutes that sugar — it’s why fresh watermelon tastes refreshing rather than overwhelming.
Remove the water and the same sugar stays behind, now packed into a small fraction of the original mass. Half a watermelon — about 4–4.5 lbs of flesh — dries down to roughly 8–10 ounces of jerky, close to one-eighth of the starting weight. The sugar that was spread through all that fruit is still there, concentrated into that one-eighth. By weight, a piece of finished jerky carries roughly seven to eight times the sugar of the same weight of fresh watermelon. That’s the candy effect: a couple of small pieces deliver the sweetness of a large wedge of fresh fruit.
This is the same concentration mechanism that makes raisins sweeter than grapes, and Medjool dates sweeter than fresh figs. It’s not magic and it’s not processing — it’s physics. Less water means less dilution of the flavor compounds that were always there.
The important corollary: the quality of the finished jerky is entirely determined by the quality of the fresh watermelon. A mealy, undersweetened watermelon will produce muted, slightly bland jerky. A sugar-ripe July melon will produce jerky that genuinely tastes like candy. Start with good watermelon.
The Math of Shrinkage — What to Expect
Half a watermelon before cutting: roughly 5–6 lbs of fruit, including rind. After removing rind and white pith: roughly 4–4.5 lbs of red flesh. After dehydrating to completion: roughly 8–10 ounces (about 225–280g).
That’s a reduction to about 12–15% of the starting flesh weight — which tracks with the 91–92% water content. The visual difference is dramatic: a large bowl of strips going in, a much smaller pile coming out. This is fine and expected. Two or three pieces of finished jerky represent a meaningful snack.
The practical implication: if you want enough jerky to last a week as a regular snack, use a whole watermelon rather than half. For a first batch to see if you like it, half a watermelon is plenty.
Slice Thickness — The One Variable That Matters Most
¼ inch (6mm): the target. Thin enough to dry evenly in 15–18 hours in a dehydrator, produces a soft-pliable to firm-chewy texture depending on how long you go. Thin slices also maximize surface area, which is why the flavor is more intensely concentrated per piece — you’re biting through less fruit at once.
3/8 inch (10mm): thicker chew. Takes 18–24 hours, produces a more substantial, meaty bite. Some people prefer this — it eats more like actual jerky. Risk: the center sometimes dries more slowly than the edges, so you need to check carefully (peel a piece open if unsure).
½ inch or thicker: not recommended without pre-treatment. At this thickness, the outside surface reaches ideal dryness while the interior can still hold meaningful moisture. You’ll hit a point where the outside looks and feels done but the center isn’t. To go thicker, you can pre-treat: briefly microwave the strips for 45–60 seconds on high before dehydrating, which opens the cell structure and lets moisture escape more evenly.
Key prep step that most recipes skip: After cutting, lay the strips on a paper towel and blot the surface dry. Fresh-cut watermelon bleeds juice freely, and a wet starting surface adds 1–2 hours to your drying time. One pass with a paper towel per side makes a noticeable difference.
Remove the rind completely — the white pith and green skin don’t dehydrate at the same rate as the red flesh and will create an uneven result. Flesh only.
Dehydrator vs. Oven: The Honest Comparison
Food Dehydrator (Recommended)
Set to 135°F — the standard USDA-recommended temperature for fruit. This is hot enough to dry efficiently without degrading heat-sensitive compounds or causing the sugars to caramelize before the water can escape.
Time: 15–20 hours for ¼-inch strips. Check starting at 15 hours; most standard watermelons finish in this window. Thick-flesh varieties or anything cut thicker will need more time.
The dehydrator’s advantage is set-it-and-forget-it consistency. Every tray gets the same temperature and airflow. You can load it before bed and check in the morning. The only active step is rotating trays halfway through if your dehydrator is a round stackable model (box-style dehydrators with rear fans are more even and often don’t need rotation).
Conventional Oven (Works, With Effort)
Set to 150–170°F — your oven’s lowest setting, typically labeled “warm” or “dehydrate” if the feature exists. Note that many home ovens run 10–25°F hotter than their stated temperature at low settings; if you have a probe thermometer, check what your oven actually runs at the lowest setting.
Critical: prop the door open 1 inch. This is not optional. The watermelon will release enormous amounts of steam as it dries. Without ventilation, that steam cannot escape and re-saturates the strips as it condenses inside the closed oven. Use a wooden spoon or oven-safe utensil as a door stop.
Use a wire rack over a baking sheet. Strips placed directly on a sheet pan have no airflow under them, so the bottom never dries properly. A cooling rack placed inside a rimmed baking sheet gives you airflow on all sides.
Time: 8–12 hours, with the door cracked. Expect some variation across the oven’s hot spots — check multiple pieces and pull done ones early.
Air Fryer: Not Recommended
Air fryers typically run their lowest temperatures at 170°F+, which is too hot for slow, even fruit dehydration. At higher temperatures, the surface of the watermelon caramelizes or crisps before the interior can dry, giving you an inconsistent texture. Some air fryers have a dedicated dehydrate function at lower temperatures — if yours does, it can work, but the small basket means you can only do a few strips at a time.
How to Know It’s Done
This is where most first-timers make a mistake — pulling the jerky too early because it looks done on the outside.
Done: The surface is completely dry when you touch it, with zero stickiness or tackiness. When you try to bend a strip, it curves (pliable) but doesn’t spring back. When you bend it sharply back on itself, it cracks or breaks. No visible moisture when you tear a piece open. Color has deepened to a dark ruby-red.
Not done yet: Surface still feels tacky or sticky. Piece springs back when bent instead of staying curved. Lighter pink-red color in the center. The edges look darker than the middle.
Overdone: Piece is rigid, won’t bend without snapping — basically breaks like a chip. This is still edible (it tastes like watermelon candy glass), just not the ideal chewy texture. If this happens, pop the pieces in an airtight bag with a slightly damp paper towel (not touching the jerky) for 30–60 minutes — the moisture will be absorbed and soften the pieces slightly.
The doneness window — pliable but breaks on a sharp bend — is exactly the fruit leather texture. If you want chewier, pull earlier. If you want drier and more intense, go longer.
Seasoning: 5 Ways
The base recipe is plain: no seasoning, no lime. The natural sweetness is the whole point. These five variations layer on top of that base.
1. Tajin + Lime (The Most Popular)
Squeeze fresh lime juice over the strips before they go in the dehydrator, then dust with Tajin Clásico (chili powder + dehydrated lime + salt). The Tajin bakes into the surface and intensifies as it dries. Result: sweet, spicy, salty, citrusy — the Mexican street-fruit flavor in jerky form. The single best pairing for watermelon.
2. Chamoy + Tajin
Brush a thin layer of chamoy sauce on one side of each strip, then dust with Tajin. Chamoy is a Mexican condiment made from pickled fruit (usually apricot or plum), chili, salt, and lime — it’s tangy and sweet and funky in the best way. With Tajin on top, you get layers: sweet fruit, tangy chamoy, chili heat, citrus. This is the Mexican street candy version, similar to “mangonada” flavors.
3. Flaky Salt + Black Pepper
The minimalist adult version. Just a light scatter of Maldon (or any flaky sea salt) and a few grinds of black pepper before dehydrating. The salt amplifies sweetness through contrast (the same reason a small amount of salt improves desserts), and the black pepper adds a subtle earthiness that the other seasoning options don’t have. Good on a cheese plate next to sharp cheddar or aged gouda.
4. Cayenne + Lime + Honey
Brush very lightly with honey (too much prevents drying — keep it to ½ teaspoon per strip), squeeze lime juice over, then dust with cayenne. The honey caramelizes slightly during drying and adds a slightly jammy quality. This version has more complexity — sweet, hot, tart — and is good for trail snacks or backpacking (honey is shelf-stable, calorie-dense, and the dehydrated version travels well).
5. Everything Bagel Seasoning
Unusual but works. Dust the strips with everything bagel seasoning (sesame seeds, poppy seeds, dried garlic, dried onion, flaky salt) before dehydrating. The seeds toast slightly during the long drying time. Result: savory-sweet, nutty, slightly onion-y. Works well next to cream cheese or hummus as part of a snack board.
Watermelon Selection
Any seedless watermelon works, but ripeness and variety make a real difference in the final product.
How to pick a ripe watermelon:
- Field spot: The creamy yellow-to-orange patch where the melon sat on the ground. Pale yellow or white = underdeveloped; deep yellow or orange = longer on the vine, more sugar.
- Sound: Tap the outside with your knuckle. A ripe watermelon produces a hollow, low-pitched thud. An unripe one sounds higher-pitched and more solid.
- Weight: For its size, a ripe watermelon should feel heavy — it’s full of water, which is what you want.
- Skin: Dull, not shiny. Shiny skin means the rind is still developing.
Peak season for jerky: Late July through early September, when heat units have fully developed the sugars in field-grown melons. Grocery store watermelons available year-round are often picked early for shipping durability and tend to have lower sugar content — they still work, but the flavor ceiling is lower.
Seedless varieties: Any standard seedless variety from a grocery store or farmers market is fine. Heirloom varieties with unusual flesh colors (yellow, orange, white) dehydrate the same way, though the visual result is interesting — orange-fleshed watermelon jerky looks nothing like the original.
Storage
Room temperature, airtight container: 5–7 days. Works if your kitchen is cool and dry. Use a glass jar or sealed zip-close bag with air removed.
Refrigerator: 2–3 weeks. The cold environment inhibits any microbial activity on residual sugars.
Freezer: Up to 12 months. The jerky is already dry, so freezing doesn’t cause ice-crystal damage. It thaws at room temperature in a few minutes without significant quality loss.
Humidity warning: Dried fruit is hygroscopic — it actively pulls moisture from the air. Store immediately after cooling, seal completely, and minimize the number of times you open the container in a humid kitchen. If you live somewhere humid (Florida, Gulf Coast, Pacific Northwest in winter), a food-safe silica gel desiccant packet inside the container is worth using.
If a piece feels sticky after storage: It wasn’t fully dried, or it absorbed ambient humidity. Return it to the dehydrator for 2–3 more hours if you can; otherwise refrigerate and eat within 2–3 days.
What to Serve With Watermelon Jerky
Watermelon jerky is a standalone snack, but it plays well in a few other contexts. A summer snack board that includes jerky alongside elote corn dip (Tajin + cotija + lime) creates a cohesive Mexican-summer-flavor theme. For a backyard snack spread, it pairs naturally with ranch pickles — both are crunchy, tangy, and require no prep at serving time.
For a fruit-forward snack theme, it sits next to banana ice cream as an example of the same phenomenon: a single-ingredient fruit that transforms into something dessert-like through a simple technique. Both are genuinely no-added-sugar and worth explaining to skeptical guests.
Cost Comparison
Half a seedless watermelon: $4–8 at peak summer (less at a farmers market, more at off-season grocery stores). Tajin, lime, salt: under $1 of pantry staples.
Total for 8–10 ounces of finished jerky: $5–9.
Commercial watermelon jerky (Trader Joe’s, store brands, specialty snack companies): roughly $6–12 for 3–5 ounces.
You get twice the yield for the same or lower cost, with complete control over seasoning and sweetness level.
The labor cost is real: loading a dehydrator takes 15–20 minutes, and you’re hands-off for the next 15–20 hours. For a first batch, the time investment is worth it to understand the process. After that, it’s a set-and-walk-away project.